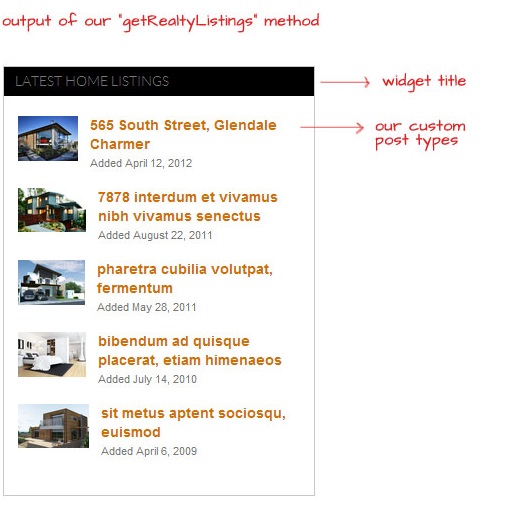
So I had a question from one my readers: “How can I add a Latest Listing widget in the sidebar“, which really translates to “How do we create a WordPress Widget?” Well, a widget that pulls our Custom Post Types. So I did a bit of research, and it turns out – that it’s not hard at all. We just need to know the basics of the Widgets API, plus a bit of PHP.
This tutorial was written using Realty, since it’s already using Custom Post Types for the House Listings. So I am trying to shoot 3 birds in one stone: 1) To answer my reader’s question, 2) to add some functionality to the theme, as well as 3) learn something new. Oh and to write this tutorial – I guess that would be 4 birds then.
So ready to start coding? Also keep in mind that this will work with regular posts – not just custom post types. You will see what I’m talking about as we dive deeper. Let’s begin.
Create the basic Widget
In your functions.php file, write the following code:
class Realty_Widget extends WP_Widget{
function __construct() {
	parent::__construct(
		'realty_widget', // Base ID
		'Realty Widget', // Name
		array('description' => __( 'Displays your latest listings. Outputs the post thumbnail, title and date per listing'))
	   );
}
function update($new_instance, $old_instance) {
	$instance = $old_instance;
	$instance['title'] = strip_tags($new_instance['title']);
	$instance['numberOfListings'] = strip_tags($new_instance['numberOfListings']);
	return $instance;
}


} //end class Realty_Widget
register_widget('Realty_Widget');
The above code sets up our widget class. It’s extending an already built class – called WP_Widget, which have methods that we need to override. These methods are: update(), form() and widget(). Don’t worry if you don’t know what that means exactly. It’s just the rules of creating widgets.
Now, notice above that we have a method __construct() – which just register’s our widget id, a name and a description. We overrode another method update() – which just makes ensures that we’re passing the right values to our $instance array (also makes sure we’re using the correct calculated instance).
So all we need to create is 2 more methods: form() and widget(). Let’s take care of that next.
The form() method
The method form() builds the form that we have in the admin section. What we’re building is a very simple form with 2 fields: a text field for the Widget title, and a drop down list for the number of listings we want to show:
function form($instance) {
	if( $instance) {
		$title = esc_attr($instance['title']);
		$numberOfListings = esc_attr($instance['numberOfListings']);
	} else {
		$title = '';
		$numberOfListings = '';
	}
[code above has been truncated – due to syntax highlighting error]
We can now also save this widget – because we have an update() method. Notice that our title and selection saves on click. Now let’s move to the widget() method.
The widget() method
This is the method that actually outputs our widget. This method accepts a couple of arguments – one of them is our $instance array.
function widget($args, $instance) {
	extract( $args );
	$title = apply_filters('widget_title', $instance['title']);
	$numberOfListings = $instance['numberOfListings'];
	echo $before_widget;
	if ( $title ) {
		echo $before_title . $title . $after_title;
	}
	$this->getRealtyListings($numberOfListings);
	echo $after_widget;
}
One thing to note is the $before_widget and $after_widget variables. These are, markups that appear – you guessed it: before and after the widget. You will also see $this->getRealtyListings() – which we’ll cover next.
Pull our Custom Posts
This method will do a query of our custom posts. It will only return the number of posts that we’ve saved in our widget. Add this code to our class:
function getRealtyListings($numberOfListings) { //html
	global $post;
	add_image_size( 'realty_widget_size', 85, 45, false );
	$listings = new WP_Query();
	$listings->query('post_type=listings&posts_per_page=' . $numberOfListings );
	if($listings->found_posts > 0) {
[code above has been truncated – due to syntax highlighting error]
So we have the above code which takes 1 parameter: $numberOfListings. We do an add_image_size() so we can get a custom size for our thumbnails. Also note where we’re querying the post_type of “listings”, you can change this value to your own post type (or not even use it for default).
The code then continues building the HTML output of list items containing our post thumbnail, title and date added.
Add some CSS
Our CSS is pretty straightforward, just keeping the elements in the right place. You also might want to use your own styles, so I’ll just post the code that I used, without further explanation.
.noThumb{
  width:85px;
  height:45px;
  background-color:#000;
  float:left;
  margin:0 12px 0 0;

}
ul.realty_widget {
  margin-top:10px;

}
ul.realty_widget li {
  margin:0 0 15px 0;
  list-style:none;
  min-height:45px;
  line-height:19px;

}
ul.realty_widget li img{
  float:left;
  margin:0 12px 0 0;

}
ul.realty_widget li a {
  font-weight:bold;

}
ul.realty_widget li span {
  display:block;
  font-size:11px;

}
So with the above styling, our final output looks like below:

Conclusion
So there you have it. We have added a widget to our WordPress theme that pulls our custom post types. As mentioned, this technique will work with regular posts as well. I have updated the Realty theme files to include this code – so you can go ahead and download it if you like. Please let me know in the comments if this tutorial helped your development in any way.